Now go to the edit html tab and tick the box to expand widget templates we are going to use conditional CSS to change how posts display on different pages. So copy the following code
<style type='text/css'>

<b:if cond='data:blog.pageType == "item"'>

span.fullpost {display:inline;}

<b:else/>

span.fullpost {display:none;}

</b:if>

</style>
Paste it just before the closing head tag like Ive done in the following screenshot below

Now scroll down and look for the following code
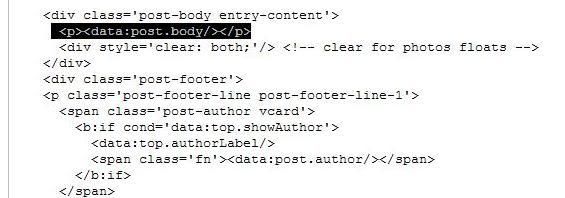
Once you have found it copy the following code
<b:if cond='data:blog.pageType != "item"'>


<a expr:href='data:post.url'>Read more!</a>


</b:if>
And paste it in like ive done in the screenshot below

Now if you preview the template you should see a Read more link at the end of your post like mine in the following screenshot or on the main page of this blog
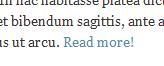
of course it doesn't have to say read more it can be whatever you want also this link is still visible even when your post is not long. Now you should save the template and go to your post editor now you will need to add this <span class='fullpost'></span> tag around the part of the post you would like to hide like i have in the screenshot below

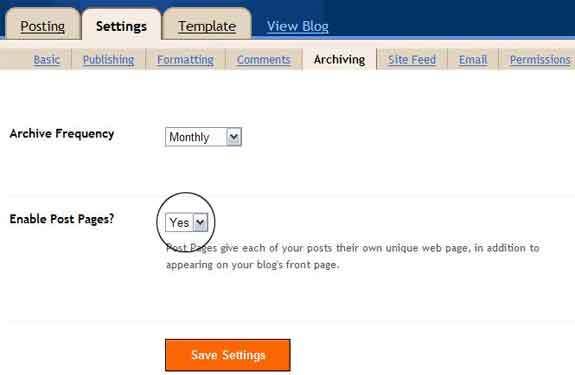
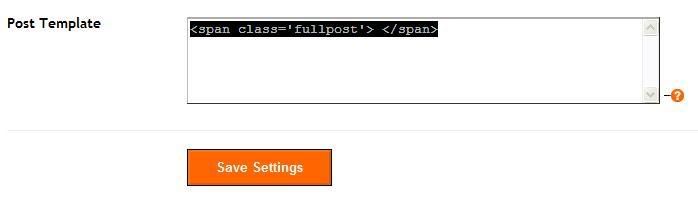
Now to save time having to enter that in everytime you post you could just go to Settings > Formatting scroll to the bottom and paste it in Post Template like i have below so you do not have to enter it in each time you want to post
i hope you enjoyed reading this post

53 Responses to “How to create expandable post summaries on blogger”
RBT
December 07, 2007It's a good post jamiz. I'm assuming that it applies to Google's blog.
Just curious. Do yo uthink it might work with WordPress?
RT...
http://www.myfuturesblog.com
Anonymous
December 07, 2007For WordPress you can use the "read more" break for the same thing. Or you could use excerpt. WordPress also have a plugin called Post Teaser to do the work automatically.
Powerful isn't it?
Alex
December 07, 2007Dude,
You are very smart. Keep this up! I always wondered how to do this. Now I do, and it wasn't that hard. Thanks and happy holidays!
Alex
www.fishingidiots.com
Amethyst
December 09, 2007Please repost images in the How To Make a 3 Column Template post. Thank you:)
Lawny
December 09, 2007Sorry about that amethyst i didnt know the image links were broken ive fixed them now
Michael J. Kannengieser
December 13, 2007Hi, Thanks for the tutorial. This is another technique I have to attempt on my battered and torn test blog before I deploy it on my production model, lol. I appreciate it. -Mike.
Gemyhood
December 16, 2007can i translate your Tutorials to Arabic and post it in my blog
confirm me plz @ mr.gemyhoood@gmail.com or a comment in my blog
Great work ;)
Lynda Lehmann
February 28, 2008Thanks for the info. I'm among the technically challenged! :)
Jonathan
March 09, 2008Hey there,
I was wondering if you could append the tutorial with a method of NOT including the Read More link when there is in fact nothing more to read. I don't want to lose the trust of my readers with any false promises.
Thanks.
Jonathan.
Worldmania
July 15, 2008great man thanks
because other sites are just posting
the message
but you make with image
thanks a lot
Claudia
August 06, 2008Thanks so much for your help. Posting the images to show exactly where to enter the code made ALL the difference!
Wimbledon
October 10, 2008Thank you SO much. Where other sites did not make any sense to this novice HTML person, you made perfect sense!
I implemented the code on my Lotus blog here:
http://lotusenthusiast.blogspot.com/
Lawny
October 11, 2008Yes Wimbledon i write my tutorials so they are easy as possible for the complete novice i shall be writing more soon
Anonymous
October 27, 2008Thanks good post, where I am having an issue is post that contain pictures.
I was able to get it to work with just text, but can't seem to get it to work on a long post with various pictures. Any help would be greatly appreciated.
treo730.com It's the post where I am reviewing a piece of hardware.
Thanks again
Lawny
October 27, 2008Treo it should work with both images and text so could you be missing something ?
Green Eggs and Wham
December 10, 2008Genius! Thanks for the tutorial. The step by step instructions are excellent.
Thanks.
harlan erskine
December 14, 2008hey I can get it to work I don't seem to have a place to put the code under
"b:if cond='data:blog.pageType != "item"'
a expr:href='data:post.url'>Read more!/a
/b:if"
(I had to del the "<"s
what do I do if I dont have the code?
Lawny
December 14, 2008@harlan erskine
what are you trying to do? the code you are talking about goes within the <data:post.body/> as described in the tutorial
harlan erskine
December 14, 2008thats the issue, I don't seem to have that code? what would that be? here is what i do have under the body area:
div class="post-body"
div
$BlogItemBody$
/div
/div
I am using the FTP version of blogger and I began this blog in 2005 is it possible that I have an old code?
Lawny
December 14, 2008@harlan erskine
Sorry but it looks like you are using the old blogger templates this only works for new blogger templates
harlan erskine
December 14, 2008ah! ok do you have any recommendations as to how I can change it? thank you for you help.
Lawny
December 14, 2008@harlan erskine
i have not worked with old blogger templates for about 2 years now so i wouldn't know
harlan erskine
December 14, 2008thanks for helping - actually it seems like its an old template because I haven't migrated over to having the blog hosted on their server? when i selected a new template it ended up giving me the same issue. Seems like I need to make it as a blogspot blog or move it to my own url. but it doesn't like it when I have the blog in a fold like website.com/blog/ only likes blog.website.com so now I have a debate do i switch it to this and loose everyone who links to me? or just keep it the same...
icedmaple
January 06, 2009I'm having the same problem as Harlan and I just opened this journal today.
Can anyone point me to which layouts are the "new ones" so that I can use this?
Lawny
January 06, 2009@icedmaple
go to the template tab on your dashboard they will be a link what says upgrade template to layouts
Anonymous
January 14, 2009I've tried your method, but I get error messages like "Please make sure all XML elements are closed properly. The element type "b:skin" must be terminated by the matching end-tag ""."
The two b:skin elements in the template are well formed, so I can't figure out how I'm getting that message.
I'm using a Blogger template of the newer versions. Any help is appreciated! Thanks for your good work!
Mike @ http://mytinyspot.blogspot.com
moose47@hotmail.com
Lawny
January 15, 2009@Mike
the most likely cause of the error you are receiving is that you may of forgotten to close a <div> tag or put the code within the wrong place. if you still cant get them working send a copy of your template to me using the contact link on my blog and i will look at it for you thanks
carlos matsuo
February 03, 2009"I was wondering if you could append the tutorial with a method of NOT including the Read More link when there is in fact nothing more to read. I don't want to lose the trust of my readers with any false promises."
im having the same issue. i dont want that in ALL my posts.. is there a way to change this to only work in posts i want it to work? thanks
Lawny
February 04, 2009@dan
it would not be possible to append the tutorial without a read more link because we would need to use javascript
carlos matsuo
February 06, 2009i see thanks
Sarah
February 27, 2009really great post and site!!
question tho- is there a way to style this differently? font, color?
also, i dont want it immediately after my text; id like it to be on a line on its own underneath. is it possible?
Thanks!!
Lawny
February 28, 2009@Sarah
yes you can have the read more link on its own line by wrapping the link in a <span> tag then apply a class name to it so you can give it different fonts and styles here's a sample
<b:if cond='data:blog.pageType != "item"'>
<span class='morelink'>
<a expr:href='data:post.url'>Read more!</a>
</span>
</b:if>
now once you have done that just write CSS code for the read more links like
.morelink{
display:block;
clear:both;
text-align:right;
font-weight:bold;
}
.morelink a{
color:#f00;
}
i hope this is what your looking for
Sarah
February 28, 2009yes great! thanks so much!
again, great work on the site
2emkay
April 09, 2009hey it doesnt seem to be working...it shows the whole post and not the summaries :( help me out
www.bussinessbubbles.blogspot.com
Lawny
April 09, 2009@MaDdy
you need to make sure you have closed all the span tags like below
<span class='fullpost'>hidden post content goes here</span>
T.Smith
April 12, 2009I'm having the same problem as MaDdy and my tags are closed. Help please
T.Smith
April 12, 2009Ok I'm no longer having a problem getting it to work. However I am having a problem with the Post Template part. As it doesn't put anything in between the codes and I have to enter it manually to get it to work.
Lawny
April 13, 2009@T.Smith
try going to settings > formatting and scroll down to the very bottom of the page until you find the field titled "Post Template" paste the following code in <span class='fullpost'> </span> then save
T.Smith
April 13, 2009That's what I did. But when I make the post nothing is hidden.
Lawny
April 13, 2009@T.Smith
you need to make sure your content is nested within the <span class='fullpost'>content here</span> tags also check your post because it may have some tags missing
T.Smith
April 13, 2009But what I'm asking is how do I get it to automatically nest in between the tags. Or will I have to do it manually every time?
Lawny
April 13, 2009@T.Smith
yes you need to do it manually
T.Smith
April 13, 2009Ok thank you.
Anonymous
April 27, 2009If I have pictures in the post, is it possible for at least one picture to appear below or above the summary text? That would be cool.
Lawny
April 27, 2009@Anonymous
yes just leave them out of the <span class='fullpost'>hidden content here</span> tags
Anonymous
April 27, 2009Thanks man! I'm going to try this. Looks so sweet! Bookmarked your site!
Anonymous
July 07, 2009Wow - so much easier to follow your instructions than the Blogger Help page! Thanks!
saintghost
July 27, 2009not working in my blog, never hide it display all my text... any can help me i follow all the instruction but it doesn't work..
Lawny
July 27, 2009@saintghost
it will not work if you have made a mistake which is probably what you have done i suggest you read the tutorial more carefully also make sure you have the post editor switched to edit html mode not compose mode also if you don't leave the url of the blog you are trying this out on i can't see what mistake you have made
saintghost
July 28, 2009you can visit my blog to see the result or if you want i paste html code here where i put the code you said if it is okey for you.. the 3 columns you post was 100% percent working in my blog you can see it, thanks for your tutorial of 3 columns it work for me :) please help me about this one thanks here my blog... saintghost.blogspot.com
thank you..
Lawny
July 29, 2009@saintghost
you have done it wrong thats why it doesn't work your style declaration is currenly like this
<style>
<b:if cond='data:blog.pageType == "item"'>
span.fullpost {display:inline;}
<b:else/>
span.fullpost {display:none;}
</b:if>
</style>
it should be like this
<style type='text/css'>
<b:if cond='data:blog.pageType == "item"'>
span.fullpost {display:inline;}
<b:else/>
span.fullpost {display:none;}
</b:if>
</style>
also your post is not wrapped around the content it is currently like this
<span id="more-28404"></span>
it should be like the following
<span class='fullpost'></span>
if you correct those it will work switch your post editor to edit html mode and wrap your content inside the span tag as shown in this screenshot
saintghost
July 29, 2009thank you so muchhhhh master :)) now is working.. later i will try your "How to add a navigation bar" more power :))
BloggerGeeze | Blogging Tutorials
March 23, 2010I have created a friendly tutorial for Blogger expandable post summary, it is new functionality added to the blogger editor. You can head on to this link article: New Expandable Post Summary from new Blogger Editor
Leave a Reply
Comments are moderated before appearing on site, comments that contain suspicious information, self-advertising or spam-like URLs will be deleted.
Note: only a member of this blog may post a comment.