
First create a new document width 200px height 200px background colour white

Now select the rounded rectangle tool and make sure you have the options set like mine below

Set your foreground colour to #d9600f press and hold shift draw a shape as big as the document like mine below

Now press ctrl + j or right click the shaped layer and choose duplicate layer from the little menu to duplicate the shaped layer now you should have 2 layers in your layers window like mine below

Make sure you have the top most layer selected then go to the main menu and choose Edit > Free Transform or just press ctrl + t now change the settings for the width and height to 97 like Ive done below and hit enter

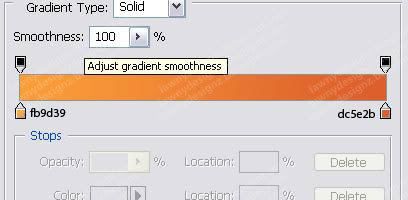
Now right click the top layer and choose blending options click gradient overlay and use settings given below

Now click on stroke and use the following settings

you should now have the following image

Now you can either download this shape i made or draw your own once you have the shape load it in Photoshop and press d then x on your keyboard to reset your foreground colour to white next holding shift on your keyboard click and drag to draw a shape like mine below

Now you have your own RSS feed icon which is vector meaning you can resize it without losing quality. The next step is optional

To make the icon a bit more interesting Ive added a glossy shine so if you would like to do the same follow along with the next step
Press ctrl and click the middle layer Ive highlighted below to create a section around it

Create a new layer then fill it with white and press ctrl + d to deselect the section now your image and layers window should look like mine below

Now select the pen tool and use the following settings make sure you have paths selected

Click once on the left side of the image and hold down shift on your keyboard and click once on the right so you have a straight line like mine below

now select the Direct selection tool and right click the line and choose Add Anchor Point create two like Ive done below

Now with the Direct selection tool still selected click and drag one of the new anchor points and move them one at a time like Ive done below

Now select the pen tool again and close the path like Ive done below

Now right click the path and choose make selection from the little menu which appears you should have a selection now go to the main menu and choose Select > Inverse or press shift + Ctrl + I to inverse the selection now make sure you have the white fill layer selected which should be the top most layer and hit delete on your keyboard and press Ctrl + D to deselect the selection turn the Opacity down to about 20 for this layer now you should have something like the final image
You can easy play around with the settings to create different colours below is just an example of what you can do

I hope you enjoyed this tutorial

4 Responses to “Create a nice feed icon in Photoshop”
Audee
November 18, 2007Hei Lawny, I will add your tutorial, to my button tutorial list ;)
Thank you so much for sharing...
what a nice looking button :)
fayaz
February 25, 2008nice blog m8, keep up the good work.
AxedbyDax
August 19, 2008very nice tutorial. I am very happy to find your site. This is a very good way to make a nice looking button.
Anonymous
March 14, 2009thnx for sharing this :)
it's so gorgeous !!!
Leave a Reply
Comments are moderated before appearing on site, comments that contain suspicious information, self-advertising or spam-like URLs will be deleted.
Note: only a member of this blog may post a comment.