Logo design is a long process which normally involves more than just design. Research, color theory and several client meetings culminate in the greatest logo designs, and in most cases, you would actually want to use Illustrator instead of Photoshop. When mocking up a design or creating a simple logo for use on the web, there is a lot you can do with the basic tools in Photoshop. In this tutorial, you'll learn how to use layers, text effects and some special techniques to create a website logo for a Hawaiian Internet Cafe.
Continue reading »Create a Cool Logo for a Business in Photoshop
Posted on Monday, January 09, 2012
3
comments
Tags:
photoshop tutorial,
tutorial
Picking a Web Host: For Designers
Posted on Tuesday, September 07, 2010
4
comments
This is a guest post by John from Webhosting Search
If you’re a passionate web designer, the Internet is your life. And if the Web is your universe, then your web host is your house, or at least, your landlord. It’s important to be very discriminating when choosing a place to live, and to find a place that will be just right for you and your guests. It’s true in life, and it’s true when it comes to web hosting.
Unlike the housing market, there are a number of very good options when it comes to webhosting, and you can get good web hosting for a very reasonable price. The problem is knowing which one to choose. You can’t just go for the cheapest one; first of all, you might need a type of hosting, like VPS, that is more expensive than the cheapest plans. Secondly, you’re going to need a level of quality for a successful site that you may not get from a super cheap web hosting plan. The time to figure out which web host you need is before you set up your site, not after. If you make the wrong choice now, moving your pages to another server will cost time and money that you don’t want to lose. Continue reading »
Tags:
articles
How to convert a photoshop document (psd) to blogger (css/xhtml)
Posted on Tuesday, March 09, 2010
27
comments
In this tutorial i'm going to show you how to code the design from my previous tutorial into a blogger template this is going to be based on the Minima template, most of the css code in this tutorial is commented to explain what is does a css comment begins with "/*", and ends with "*/", like this /* a css comment */ i have highlighted the comments in green so you don't have to copy these, if you have any questions feel free to ask in the comments.
Continue reading »
Continue reading »
Tags:
blogger layouts,
how to,
tutorial
Create a basic 2 column blog layout from scratch in photoshop
Posted on Saturday, December 12, 2009
16
comments
In this tutorial we are going to create a basic 2 column blog layout from scratch using photoshop then in another tutorial we will code this into a blogger template
start by creating a new document 900 x 800 pixel with the background colour #ebebeb
Continue reading »
start by creating a new document 900 x 800 pixel with the background colour #ebebeb
Continue reading »
Tags:
photoshop tutorial,
tutorial
How to add a basic dropdown menu to your blogger powered blog
Posted on Monday, October 05, 2009
33
comments
In this tutorial i will show you how to add a basic dropdown navigation menu to your blogger powered blog so i recommend you create a test blog or download a backup copy of your template before doing anything as i cannot be held responsible if you mess your blog layout up.
for this tutorial i'm going to use the minima template however it should work with most blogger templates once you have your template go to layout > Edit html and paste the following code just before the
Continue reading »
for this tutorial i'm going to use the minima template however it should work with most blogger templates once you have your template go to layout > Edit html and paste the following code just before the
<div id='content-wrapper'> Continue reading »
How to add a jquery image slider to your blogger powered blog
Posted on Monday, July 06, 2009
43
comments
In this tutorial you will learn how to add a simple jquery image slider to your blogger powered blog note this will not work for those who have Javascript disabled in their web browser but most people have it enabled by default if you are not sure whether yours is disabled or not check the demo you should see a working image slider also all the images must be the exact same size as each other.
I recommend you download a backup copy of your template or use a test blog I'm going to use a 3 column template from my previous tutorial but it should work with any template now we need to download two scripts named jquery.js and s3Slider.js you can read more and download the scripts from this link or just grab the embedded source code from the demo.
Continue reading »
I recommend you download a backup copy of your template or use a test blog I'm going to use a 3 column template from my previous tutorial but it should work with any template now we need to download two scripts named jquery.js and s3Slider.js you can read more and download the scripts from this link or just grab the embedded source code from the demo.
Continue reading »
How to create a fully widgetized tabbed content box on blogger
Posted on Sunday, May 24, 2009
65
comments
In this tutorial you will learn how to add a tabbed content box on your blogger blog using CSS, XHTML and Javascript in 4 simple steps it will also be fully widgetized so you can easy change colours and rearrange the widgets within your dashboard here's a simple screenshot of what we are going to create in this tutorial.
.
Note this will not work for those who have Javascript disabled in their web browser but most people have it enabled by default if you are not sure if yours is disabled or not check the demo you should see a working tabbed box.
Continue reading »
Note this will not work for those who have Javascript disabled in their web browser but most people have it enabled by default if you are not sure if yours is disabled or not check the demo you should see a working tabbed box.
Continue reading »
How to create static pages on blogger
Posted on Thursday, May 07, 2009
61
comments
Update Static pages now available in Blogger
In this simple tutorial i will show you how to create static pages within your blog on blogger so you can easy link to them from navigation links within your blog these could be any page you like such as "about me" and "contact me" pages.
so the first thing would be to either use a test blog or download a backup copy of your template before doing this to your blog as i cannot be held responsible if you mess up your blog.
Once you are ready go to your blog and create a new post using whatever title you want for this tutorial i gave mine the title of "About" now add your post content when you have finished click the "Post Options" link found at the bottom of the post editor see screenshot below

Continue reading »
so the first thing would be to either use a test blog or download a backup copy of your template before doing this to your blog as i cannot be held responsible if you mess up your blog.
Once you are ready go to your blog and create a new post using whatever title you want for this tutorial i gave mine the title of "About" now add your post content when you have finished click the "Post Options" link found at the bottom of the post editor see screenshot below
Continue reading »
How to display total post and comment count on blogger
Posted on Sunday, March 15, 2009
15
comments
In this tutorial i will show you how we can print out the total post and comment count of your blog using our blogs feed so first we need to add these two lines of javascript code which asks blogger to return our feed in JSON format which is a set of javascript objects. Don't forget to replace the red code with the URL of your blog
in the code above we have asked blogger to return our JSON feed to two javascript functions named
Continue reading »
<script src="http://www.lawnydesigns.com/feeds/posts/default?alt=json-in-script&callback=numposts"></script>
<script src="http://www.lawnydesigns.com/feeds/comments/default?alt=json-in-script&callback=numcomments"></script>in the code above we have asked blogger to return our JSON feed to two javascript functions named
numcomments and numposts so now we will create those two functions to print out the total post and comments countContinue reading »
How to adjust the size of images on blogger
Posted on Monday, February 23, 2009
26
comments
Today I'm going to show you how to adjust the size of images posted on your blog since most of my friends are having problems with changing the size of images
first switch to "edit html" mode on your post editor and find the image you would like to adjust here's my sample image code
yours may look a bit different from mine but don't worry we are only interested in the code highlighted in red this controls the width and height of your image.
Continue reading »
first switch to "edit html" mode on your post editor and find the image you would like to adjust here's my sample image code
<a href="https://blogger.googleusercontent.com/img/b/R29vZ2xl/AVvXsEjXegrEZRUvQdwO82W3OC-Fq_YnR5gs110o43dsV2zvT1K_tuMhniTFE8FS2FW_GRky7shJ2Vir_0GJIdPZs7lYWCSzdCoeymNbmcdGo9RBXO-GOWNoeS-tFLECTFtNbMC5PgpwfGjtd4Y/s400/step-01.jpg"><img style="width:304px;height:400px;" src="https://blogger.googleusercontent.com/img/b/R29vZ2xl/AVvXsEjXegrEZRUvQdwO82W3OC-Fq_YnR5gs110o43dsV2zvT1K_tuMhniTFE8FS2FW_GRky7shJ2Vir_0GJIdPZs7lYWCSzdCoeymNbmcdGo9RBXO-GOWNoeS-tFLECTFtNbMC5PgpwfGjtd4Y/s400/step-01.jpg" border="0" alt="" id="BLOGGER_PHOTO_ID_5303081243051517074" /></a>
yours may look a bit different from mine but don't worry we are only interested in the code highlighted in red this controls the width and height of your image.
Continue reading »
How to embed adsense in blogger posts
Posted on Sunday, February 15, 2009
16
comments
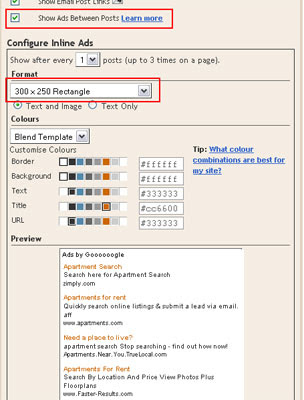
In this post i will show you how to embed AdSense ads in your blogger posts you can either have them at the top or bottom of your posts or both but remember you are only allowed a certain amount of ads on your blog so first I recommend that you download a backup copy of your template as i will not be held responsible if you mess your layout up
now if you check the box on the post widget you will see that it is a simple way to add AdSense to your blog posts

by default they are displayed at the bottom of your posts but what if we want them at the top below the post title ? or both well lets take a look at the code which is used to add the AdSense ads to the posts
Continue reading »
now if you check the box on the post widget you will see that it is a simple way to add AdSense to your blog posts

by default they are displayed at the bottom of your posts but what if we want them at the top below the post title ? or both well lets take a look at the code which is used to add the AdSense ads to the posts
Continue reading »
How to adjust margins and paddings of widgets in blogger templates
Posted on Thursday, February 05, 2009
19
comments
In this post i will show you how to adjust the margins and padding's of the sidebar widgets and the posts so I'm going to use the minima template

always download a backup copy of your template before doing anything or use a test blog as i can not be held responsible if you mess your blog up.
Continue reading »

always download a backup copy of your template before doing anything or use a test blog as i can not be held responsible if you mess your blog up.
Continue reading »
How to remove the quick edit and wrench icons on blogger
Posted on Saturday, January 31, 2009
31
comments
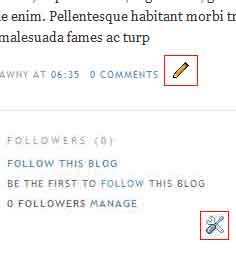
I'm writing this post because i get asked by a lot of my friends how they can get rid of those quick edit icons so if you have seen those quick edit icons under your posts and the little wrench spanner icons in the sidebar on your blog you maybe thinking how do i get rid of them or why are they there ?

in fact they are useful if you need to quickly edit your blog post's or a widget in the sidebar you can just click them to instantly edit your post or widget they are only shown to the admin of the blog if you log out you shouldn't see them but i prefer to hide or remove them since i can just login to my dashboard to edit my post or widgets
Continue reading »
in fact they are useful if you need to quickly edit your blog post's or a widget in the sidebar you can just click them to instantly edit your post or widget they are only shown to the admin of the blog if you log out you shouldn't see them but i prefer to hide or remove them since i can just login to my dashboard to edit my post or widgets
Continue reading »
How to customize your blogger templates fonts and colours
Posted on Sunday, January 25, 2009
22
comments
Today i will show you how to customize the fonts and colours of your template and I'm going to use the template from my previous tutorial but it will work for most templates you just need to find the id or the class name of the element you are trying to style.
Now if you are trying to change the font or colour of the sidebar titles through your blog dashboard it will also change the font and colour of the post date which is not what some of us want so to change that we can either hard code them in the CSS code or define variables for the font and colours i will show you both ways
by default all
Continue reading »
Now if you are trying to change the font or colour of the sidebar titles through your blog dashboard it will also change the font and colour of the post date which is not what some of us want so to change that we can either hard code them in the CSS code or define variables for the font and colours i will show you both ways
by default all
<h2></h2> tags inherit from this CSS code h2 {
margin:1.5em 0 .75em;
font:$headerfont;
line-height: 1.4em;
text-transform:uppercase;
letter-spacing:.2em;
color:$sidebarcolor;
}
Continue reading »
Create a 3 column blogger template with 2 right columns
Posted on Monday, January 19, 2009
214
comments
In this tutorial i will teach you how to create a 3 column blogger template with two narrow columns on the right and a section above the two columns here's a simple screenshot of the layout I'm planning to teach you to build

now you have an idea what we are going to build lets get started. I recommend you use a test blog for this tutorial using the minima template i always use this template because its an easy starting point once you have your template go to layout > Edit HTML scroll down and delete the width from within the CSS #header-wrapper
Continue reading »

now you have an idea what we are going to build lets get started. I recommend you use a test blog for this tutorial using the minima template i always use this template because its an easy starting point once you have your template go to layout > Edit HTML scroll down and delete the width from within the CSS #header-wrapper
Continue reading »
Tags:
blogger,
blogger layouts,
how to
How to highlight authors comments on blogger
Posted on Monday, November 17, 2008
6
comments
This post shows how you can highlight authors comments on your blogger blog using CSS and if/else tags im going to use the minima template so like i always say backup your template or use a test blog now go to edit html and make sure you have expand widget templates check box checked look for the comments-block like i have in the following screenshot

Continue reading »

Continue reading »
How to display widgets on certain pages in blogger
Posted on Monday, June 30, 2008
8
comments
Today I'm going to show you how we can get widgets to display on certain pages within your blogger blog using if conditional tags
so first i recommend you download a backup copy of your template or use a test blog.
Now for this tutorial I'm going to add a simple HTML/JavaScript widget (it could be any kind of widget) in the title field of the widget i named mine "My Widget"
the reason i did this is so that we can easy identify it when we switch to the edit html tab make sure you have the expand widget templates checkbox checked and find the code for your widget here's a screenshot of mine
Continue reading »
so first i recommend you download a backup copy of your template or use a test blog.
Now for this tutorial I'm going to add a simple HTML/JavaScript widget (it could be any kind of widget) in the title field of the widget i named mine "My Widget"
the reason i did this is so that we can easy identify it when we switch to the edit html tab make sure you have the expand widget templates checkbox checked and find the code for your widget here's a screenshot of mine
Continue reading »
How to split your blogs header into two widgets
Posted on Saturday, June 07, 2008
19
comments
This post shows how you can split your blogs header into two widgets like the following screenshot

so i recommend you backup your template or use a test blog for this example I'm going to use the Minima Template so if you are using a different template the code would be different. The default width of the template header-wrapper code is 660px
(if you don't know what I'm talking about see screenshot below)
Continue reading »
so i recommend you backup your template or use a test blog for this example I'm going to use the Minima Template so if you are using a different template the code would be different. The default width of the template header-wrapper code is 660px
(if you don't know what I'm talking about see screenshot below)
Continue reading »
How to fix your blogs header
Posted on Saturday, May 31, 2008
10
comments
Today im going to show you how you can fix your blogs header as lots of blogspot users have been having problems with their header image so i recommend you download a backup copy of your template or use a test blog now you will need to expand the widget templates and find the following code highlighted in the screenshot

it should be within the #header-wrapper when you have found it replace it with the following code
Continue reading »

it should be within the #header-wrapper when you have found it replace it with the following code
Continue reading »
How to stop widgets been deleted when uploading templates
Posted on Wednesday, May 07, 2008
1 Comment
So if you have ever downloaded a free template and wanted to install it without having to reinstall all those sidebar widgets again read on im going to use a 3 column i created for this tutorial you can download it for free here
i recommend you use a test blog for this tutorial by default when you create a new blog it will already have 2 sidebar widgets installed so you should add another two for this tutorial. Continue reading »